Saturday, June 26, 2010

Top 10: Night Photography


Photos at night can be tricky.  There is a lot of room for error and most night pictures don't turn out.  I am developing my skills in this area and thought I would pass on a few pointers that I have learned in Kara's class and a few I hammered out on my own:
  1. You must have a tripod.  A sturdy ledge can work, but a tripod will give you the best results.
  2. A shutter release or remote of some kind is handy.  You can also use your timer, but set it so that the camera is completely still before it starts to expose.
  3. Low ISO = less grainy pictures.
  4. Slooooooow shutter speed.  Gotta get as much light in as possible.
  5. Flip to manual focus.  There won't be much light and it's totally frustrating to stand in the dark cussing at your lens as it goes in and out trying to find something to focus on in the dark.
  6. Be patient.  I exposed most of my photos for at least 30 seconds and then it took my camera a minute or two to actually make the photo.  I drained a full battery in less than an hour.
  7. Speaking of batteries - bring an extra if you want to spend some real time shooting.
  8. Don't be afraid of what the pictures look like on your LCD.  They can be edited in Photoshop and most will have an overcast of yellow from any ambient light.
  9. Experiment - things that are beautiful in the day take on a whole new look at night.  Also - critters come out at night - this can be fun or a little spooky depending on your tolerance!
  10. Get low - on the ground low.  Perspective can make a totally boring shot seem interesting. 
Have fun and happy shooting!

A toad - he jumped during the exposure making a ghosty appear to the right of him.

My neighbor's tree took on a whole new look at night.

Thursday, June 24, 2010

When old becomes new


I have this lovely craft room chair that was given to me ages ago when Kev and I first got married.  We call it the Catholic chair because it has a little kneeling bench on the backside and folds up just like extra chairs at church do.  I love it and plan to never part with it.  However, it was in desperate need of a makeover and I thought I should approach recovering this special chair with gusto. 

As every mom knows, Hobby Lobby is amazing, but not so much when you have three kids in tow.  As I made my way to the fabric section with a stroller full of three kids (yes, three - most amazing stroller ever), the Hobby Lobby crash began.  You see, my kids have an expiration when it comes to time spent in stores.  The commissary has a 45 minute expiration before they start in with the whining and crying.  Hobby Lobby is about 15 minutes.  I don't know why it's so little at the best places ever, but it is what it is.

So - we are in the fabric section and the meltdowns begin.  I find the most fantastic fabric ever and get it cut only to find out that is was mismarked and the fabric lady is not going to budge on the price.  The kids are crying, I am sweating at this point (99 degrees outside and a balmy 80 indoors and I have been pushing three kids in a stroller), and the lady is just looking at me with pity filled eyes.  I grab the fabric, run to the checkouts, begrudgingly hand over my money, and make it out the door with minimal yelling, only to have my four year old announce, "Thank God we are leaving Hobby Lobby!"  No joke!  I laughed out loud.  What else could I do?

Later in the week I finally got a moment to recover my beloved chair.  It was fairly simple - mostly removing screws, stretching some fabric, and using the staple gun.  It still needs some more staples, but I am having a hard time finding the right sized staples for my gun.  Apparently, I have the "girl" version of a stapler and have to go to a teeny tiny hardware shop to order my staples.  Oy!

After all was said and done, I took my new chair to the front yard to photograph and had a very curious two year old interested in trying it out.  She gave it her approval and I couldn't be happier!

The new and improved Catholic chair


Stella Bella gives it her approval

Wednesday, June 23, 2010

Wait...in front of the camera?

I have been taking this class by Kara Haupt and her prompts over the last couple of days have been inspirational to me.  It's not just about getting to know my camera and my inner artists, but for me, this class is about getting to know myself.  Not an easy thing to do.  For so long now, I have been a mom, a wife, an Air Force dependant.  Somewhere in all of this clutter, sits the girl I used to be - or the girl I am, I suppose.  I find myself defining who I am by the other people around me and what my day consists of (which is poopy diapers and laundry in case you were wondering), and I have lost me. 

My first task was to take a self portrait. Now, if any of you are the photogs behind the camera, you know that we don't do so well in front of the camera.  Yeah...that was a challenge.  Not only did I have to get over my insecurities of not looking like a magazine cover, I also had to figure out how to be photographed without making stupid faces that were my version of a thick candy coating.  I am who I am and I expect to figure it out, or at least begin, this summer.  We'll see.  In an effort to show you the silliness that ensued in my quest for a self portrait - I share with you these "epic" oopses.  I hope you enjoy them!


And the one I finally decided on as my "real" self portrait...


Thursday, June 17, 2010

The Dreaded Layout Drawer


I don't know about the rest of you, but I keep a layout drawer in my scrap room.  It is a drawer that holds ideas, unfinished pages, and layouts that I am just stuck on.  For today's torture, err, um, "challenge," I decided to tackle the layout drawer.  To my surprise, I found that I was creative along the way, but just needed a few finishing touches here and there as well as a new perspective. 

By no means have I found the bottom of the drawer (I know what's down there and I'm scared of it - more on that later), but I did finish up a few cute layouts in under an hour!  Woohoo!


I seriously added a sticker and the journaling. I have no idea what the hold up was with this page...


I remember stamping this and having it turn out all wrong.  I got out the markers and jazzed it up a bit.  This could have been the hold up.  One thing goes terribly wrong and sometimes it all just falls apart.


This one just needed a photo.  Sheesh!  I used StazOn Opaque Cotton White to get the title to be all ghosty.


Use scrap fabric and StazOn Ink to make cute, cheap embellishments!


I had cut out the wave and stuck it in the drawer, but didn't have anything else with it...no sketches, no words, nothing.  So, I went with the flow and printed pictures from last weekend and with some buttons and polka dot paper, those two wonky waves turned into this two page layout!  It think it's my favorite.


I made a simple title with a white pen and some left over Thickers chipboard letters.


My favorite shot of the day.  

If you are stuck on a layout, just put it in the drawer and wait.  Let it simmer and in a week take it out again.  If it's still not ready, put it back.  If your drawer is overflowing like mine was, tackle it.  You just might find something that is completely different than what you put in.

Monday, June 14, 2010

Time to Stretch

I just signed up for the coolest class!  Sometimes we need a little inspirational break and a chance to stretch ourselves...and this is it!  This ten day class is being taught by a very cool, very insightful 17 year-old named Kara Haupt.  It features journaling, photography, art, downloadable embellishments, and so much more!  Check out her blog and join me in the Summer of Love.  I can't wait!

Sunday, June 13, 2010

The Perfect Dress


I just picked up Fourth of July outfits for the kids at Target and was thinking about my own festive outfit.  Through some serious Googling, I found Unique Vintage and the dress that I just have to have.  I know - it's cute and froofy (yes, that's a word) and I have nowhere to wear such a beauty (sob) and even if I did, could not justify $140 for just one summer dress (double sob), but a girl can't help what she likes.  You know I would have to get those fabulous shoes too and would end up in the ER with a broken ankle because my heel got stuck in the grass!  Oy!

Alas, I will just pine after this dress and continue the search for the right outfit for dolling out sparklers and jello salad...

Friday, June 11, 2010

imagine


Sometimes art happens when you least expect it and with the most bizarre items.  I recently picked up the newest issue of Cloth Paper Scissors, which happens to be my new favorite magazine, and fell in love with the cover art.  I decided I wanted one of my own and gathered up my box of scrap paper, an old sewing pattern, and some glue.  With a little direction from my four year old ("Put that there mom, no, RIGHT THERE,") I managed to create my very own recycled art! 

I began with a Huggies box - no joke!  I tore off the side and painted the brown side of the box, then began gluing down random pieces of left over scrapbook paper.  I took an old sewing pattern, tore it up and also glued it down.  (Hint:  look for the darts, telephones, and instructions on the pattern for a cool look.)  I used a little white paint over the top of everything to bring out the crinkles in the pattern. 


For the paper flowers I cut random stacking circles, drew on them with Sharpies, and stitched them together with floss and a button.  Then, I crinkled the edges to distress them, used a Sharpie to draw a stem, and stuck 'em down.  Once all the flowers were done, I punched three holes on the left and added ribbon, brads, and a butterfly embellished button.


It needed one more thing in the upper right corner to balance the ribbon, so I stamped the imagine stamp by Autumn Leaves with my Black Stazon Ink and colored it in with the new Blueberry Sharpie.


It is on the art wall in my house and I have to say for a recycled project using scraps and leftovers, I think it turned out pretty cute!  I wish you luck and hope this project inspires you to make something beautiful out of your junk!

It's here! It's here! It's really, really here!


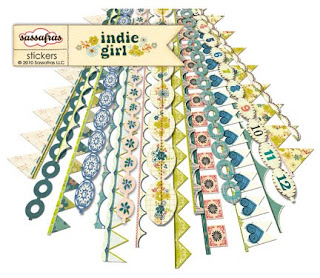
Sassafras Lass just introduced their complete line of Indie Girl!  It's amazing and I think I just might have to buy it all!  The muted greens, blues, and yellows give it an old fashioned feel and the patterns remind me of just about every outfit my mother put me in during the 80s.  The best part of this new line are the stickers!  There are die cut borders, glitter alphas, flowers, tags, and doodads galore!  Sassafras Lass, you always deliver and I am forever a loyal fan.

Thursday, June 3, 2010

Just Do It!


Stella, Connor, and Kristjan on our way to the beach

Have you heard of Mom's Night Out?  My local church hosts a mother's evening out with snacks and activities for the little ones, but a national night out?  Woohoo!  I had no idea until I came across a posting at 5 Minutes for Mom who linked me to MNO.  Many moms have already had their parties for this year, but some of us missed it, so lets do it again!  On May 6th, moms across America got out of the house...without kids...and enjoyed themselves! 

I know for many of us, getting out of the house without kids in tow is a big deal and sometimes we leave and are just dumbstruck because we have no idea what to do.  Sometimes it's just nice to grocery shop without little fingers grabbing at the candy on hang tags or yelling about fruit snacks.  But, this Sunday - I pledge do something fun - FOR ME!

Plans are already in motion for a fun-filled night of BINGO at the club on base.  I love to see all the lol's (little old ladies) with their tchotchke's all in a row, taping together all their bingo cards, while sucking down a coffee.  I admit, I am not an avid bingoer and I often have to ask irritating questions like, "Which one is this?  Is this the one with the corners or not?"  But, my bestie understands, giggles, and always helps me out.  You see, I'm her good luck charm.  I don't win, she wins, but that's besides the point.  For $40, I get three hours of peace and quiet, get to accidentally dobber my fingers, eat the best french fries in town, and laugh with my friend (all kid free)!  

Moms, if you're out there - make plans.  Do something for yourself and don't feel bad about it.  The laundry will wait until you get back.  Dads, watch your kiddos with a happy heart and tell Mom not to worry - you'll do the laundry!

Plus, when all is said and done, I can use these really cute Jenni Bowlin Bingo cards and make a project!

Wednesday, June 2, 2010

Summer Time! Summer Time! Sum, Sum, Summer Time!

It's officially summer time in our house and I felt like making a page to celebrate.  Yes, I know summer doesn't actually start until the 21st of June, but when the pool comes out - it's summer right? 

For this page, I machine stitched a crazy border on a piece of plain white card stock.  Then, I used pool blue acrylic paint, an old paint brush, and some paper towels to make a smudgy mess up in the corner.  I tore the edges of the pictures to make them just as messy as everything else and then hunted for some embellishments.  I ended up using some Recollections dimensional stickers, Sassafras Lass layered blossoms, Prima flowers with Glimmer Mist, and some random buttons.  I made my own feltie by stitching a big yellow button to some felt circles and then adhered it to a recycled layered blossom.  I also stamped with white acrylic paint on a piece of left over fabric and used it in the corner as my date. 

Overall, this project took about an hour - mostly the sewing and finding just the right embellishments.  That reminds me - I need to clean the scrap room!

Tuesday, June 1, 2010

Basic Grey Fabric

Is anyone else as excited about this as I am???  Basic Grey and Moda have teamed up to bring us amazing fabric and will be rolling out some of their best patterns soon.  I can't wait to get my hands on Origins!  I want to make a jumper for Stella and a quilt and blankies and a purse and a skirt for me and and and...

Well Begun is Half Done


I am a crafter. I paint, glue, smudge, ink, and distress just about anything I can. Blogging is not in my repertoire, but I was informed that if you are a somebody, and you wanna be a big time scrapbooker, you have a blog! So - for the two of you out there reading this - I am making an attempt to write creatively and post my newest projects and ideas. Here goes nothin'!

Recently, I have been in class, which takes up any time I might have left over after taking care of the kids, house, etc. Thankfully, I am in art school and have gotten the opportunity to take an actual art class. (In case any of you are considering art school, don't be disappointed when they require you to take math and chemistry before you actually get to make art). I have been studying Art Nouveau and the Arts and Crafts Movement from the early 1900s.

In an attempt to complete a previous project and come up with a creative idea to complete an assignment, I made a chair. Now - let me set the record straight - I bought a bare wooden chair from IKEA and painted it laboriously, put a few screws in place with the help of my four year old, and then poly coated the whole thing. I did not turn wooden spokes on a lathe or anything! This chair is for Connor - my 11 month old. It's too big for him, but he'll grow into it and I'll get some cute pictures out of the deal.

So the goal is to paint six chairs and make my table like the one in Monica Geller's apartment on Friends. My chairs are all the same, but will have new shiny paint in each family member's favorite colors. We shall see how this project unfolds...